We all love little projects that don’t take much time and take even less money to complete! Check out these 5 ideas to get you started on DIYing your home today!
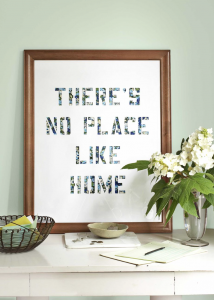
1. There’s No Place Like Home Art
Reward a great quote (we cribbed from The Wizard of Oz) with the gallery treatment, courtesy of this project adapted from Meg Mateo Ilasco’s Crafting a Meaningful Home ($24.95; STC Craft).
Step 1: Lay a piece of poster board on a flat surface. Use letter stencils ($7.69 for a set; ) to spell out the phrase of your choice on the board, experimenting until you find a placement you like. (Use a ruler and pencil to mark horizontal lines for guidance.)
Step 2: Spell out the phrase backward, then flip the stencils over (you’ll be turning the board over when you’re done, and the words will then read correctly). Trace the letters onto the board with a pencil.
Step 3: Carefully cut out the letters with an X-Acto knife, then use hem tape to affix a patterned piece of fabric to the poster board. Flip the poster board over to reveal the finished artwork, then frame.
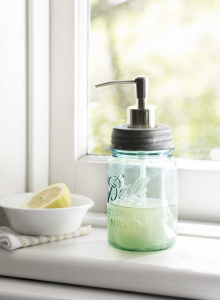
2. Mason Jar Soap Dispenser
Repurpose the classic Mason jar as a soap or lotion dispenser in your bathroom.
Step 1: First, measure and mark the center of the jar’s lid.
Step 2: Using a 1/2″ high-speed steel drill bit (about $10; local hardware store), drill a hole to fit the width of a soap dispenser pump. We used pumps from old lotion bottles.
Step 3: Fill the jar with liquid soap, screw the lid back on, and insert the pump. You may need to trim the bottom of the pump to fit your jar.
3. Embroidered Wall Art
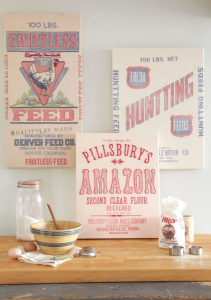
What truly elevates this idea from contributing editor Cathe Holden is the 3-D stitching that makes these graphics pop. (Just check out the close-up at right.) Create a masterpiece from your own sack, or nab a vintage one from eBay for about $10.
Step 1: Use a seam ripper to open the bag along the seams, so you’re left with a flat piece of fabric. Hand-wash, and press with an iron.
Step 2: Embroider the words and images as desired, matching your embroidery floss to the bag’s colors. (For stitching tips and instructions, see .)
Step 3: Center your bag on a blank canvas board—choose a board that allows for at least two inches of the bag’s fabric to wrap around all sides ( 9″W x 12″H; ). Apply Shurtape double-sided carpet tape to the board’s side and back edges ( 1⅜”W x 42’L;).
Step 4: Tightly wrap the bag around the board, pressing it firmly against the tape; then trim away any excess fabric along the back. Add picture-hanging hardware to the back of the board (if desired) and display
4. Papier-Mâché Bowls
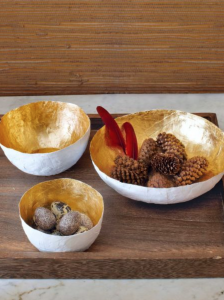
Upcycle shredded paper into a set of gilded decorative bowls. First, choose a bowl (or multiple different-size bowls) to use as a mold. For each container you plan to create, follow these steps:
Step 1: Tightly cover the outside of your bowl with plastic wrap, securing it on the inside with painter’s tape, and turn upside down. In another bowl, mix equal parts Elmer’s white school glue and water. Dip shredded paper into the mixture, evenly coating each piece; then lay the strips atop the plastic-wrapped bowl so they overlap, until the bowl’s exterior is completely covered. Let dry for three hours.
Step 2: Flip the bowl right side up and trim away any excess paper along the rim with scissors. Then, loosen and separate your paper bowl from the plastic-wrapped bowl.
Step 3: Paint the interior of your paper bowl with white acrylic paint and let it dry for one hour; then paint the exterior and let it dry for an hour.
Step 4: Cover the outside of your paper bowl with wax paper, securing it to the bowl’s outer rim with painter’s tape. Next, apply gold leaf to the bowl’s interior using our Artisans Collection Holiday Gilding Kit . Follow the package instructions, and let set overnight.
Step 5: Apply neutral-toned Liberon Wax to the interior of the bowl with a soft cloth . Allow the wax to set for an hour, then gently buff to a shine with a clean soft cloth. Finally, remove the tape and wax paper, and display a few treasures in your lustrous vessel.
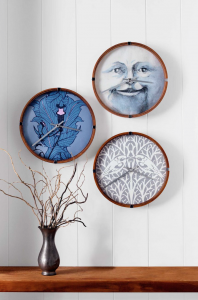
5. Patterned-Paper Clock
Patterned paper is all you need to overhaul a wall clock (for similar, DecoMates, ; 11 3/4” diam.; ). (gray birds, ” square; Blue floral, ; 11″W x 27″L; ).
Use a screwdriver to pop off the clock’s backing and battery, then lift out the face. Gently remove the hands, nut, and washer with pliers. Set aside all parts, noting their order for reassembly. Trace the shape of the clock face onto your wallpaper or printed art, then cut out the circle. Center the paper atop the face, patterned side facing out, and secure with double-sided tape. Use a T-pin to poke a hole through the paper for the clock hands; reassemble all parts and hang.
|Haultail|Demo Bags|